
Skin & Pressure Sores
after Spinal Cord Injury
Sections:
- What is a Pressure Sore?
- Stages of Pressure Sores and How to Care for Them
- How to Know if the Sore is Healing
- Signs of Trouble
- Complications Caused by Pressure Sores
- Reapplying Pressure
- Prevention
What is a Pressure Sore?
A pressure sore (or bed sore) is an injury to the skin and tissue under it. Sitting or lying in the same position will begin to cut off the flow of blood to that area, blocking oxygen and vital nutrients from maintaining healthy tissue. When the tissue becomes starved to too long a period of time it begin to die and an pressure sore starts to form.
Pressure sores will also be referred to as pressure ulcers or decubitus ulcers. Damage from a pressure sore will range from slight discoloration of the skin (stage 1) to open sores that go all the way to the bone (severe). The affected area may feel warmer than the surrounding tissue. In light-skinned people, the discoloration may appear as dark purple or red. In darker-skinned people, the discoloration will appear darker than the surrounding tissue.
A pressure sore is serious. It must not be ignored. With proper treatment, most pressure sores will heal.
A pressure sore is any redness or break in the skin caused by too much pressure on your skin for too long a period of time. The pressure prevents blood from getting to your skin so the skin dies. Normally the nerves send messages of pain or feelings of discomfort to your brain to let you know that you need to change position, but damage to your spinal cord keeps these messages from reaching your brain.
You may need to learn new ways to change your position to prevent too much pressure. Pressure sores can occur, for example, when you sit or lie in one position too long. Shearing is also a kind of pressure injury. It happens when the skin moves one way and the bone underneath it moves another way. An example of this is if you slouch when you sit.
Another type of injury, an abrasion, can occur when pulling yourself across a surface instead of lifting. This is an example of a friction injury. In addition, short exposure to high pressure, such as a bump or fall, may cause damage to the skin which may not show up right away.
Stages of Pressure Sores
and How to Care for Them
Stage One
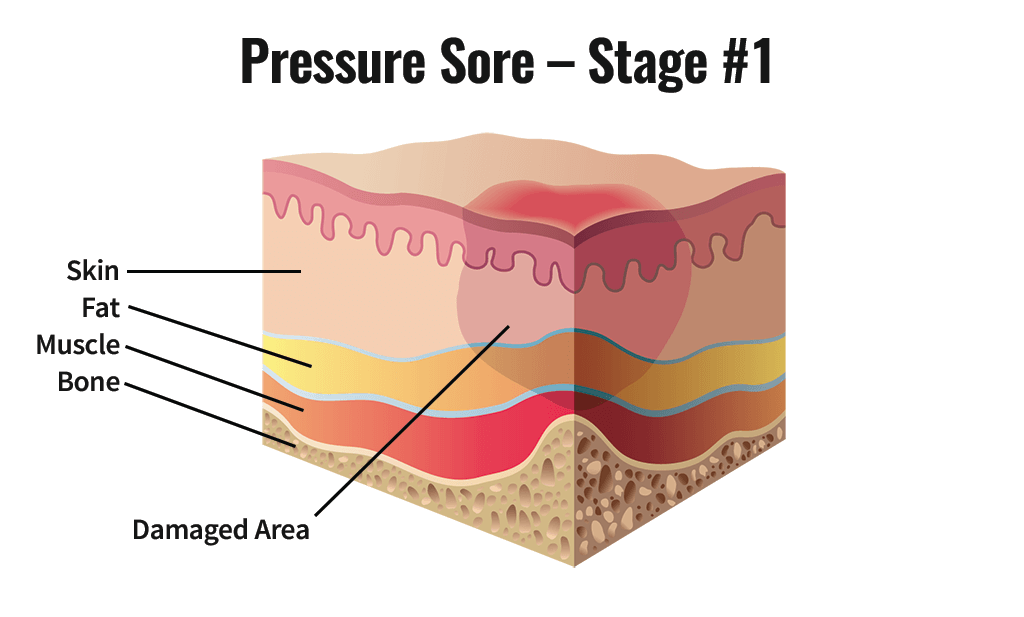
How to Recognize
Skin is not broken but is red or discolored. The redness or change in color does not fade within 30 minutes after pressure is removed.
What to Do
- Keep pressure off the sore!
- Maintain good hygiene. Wash with mild soap and water, rinse well, pat dry carefully (but gently). Do not rub vigorously directly over the wound.
- Evaluate your diet — are you getting enough protein, calories, vitamins A and C, zinc and iron? All of these are necessary for healthy skin.
- Review your mattress, wheelchair cushion, transfers, pressure releases, and turning techniques for possible cause of the problem.
- If the sore seems to be caused by friction, sometimes a protective transparent dressing such as Op-Site or Tegaderm may help protect the area by allowing the skin to slide easily.
- If the sore does not heal in a few days or recurs, consult your health care provider.
Stage Two
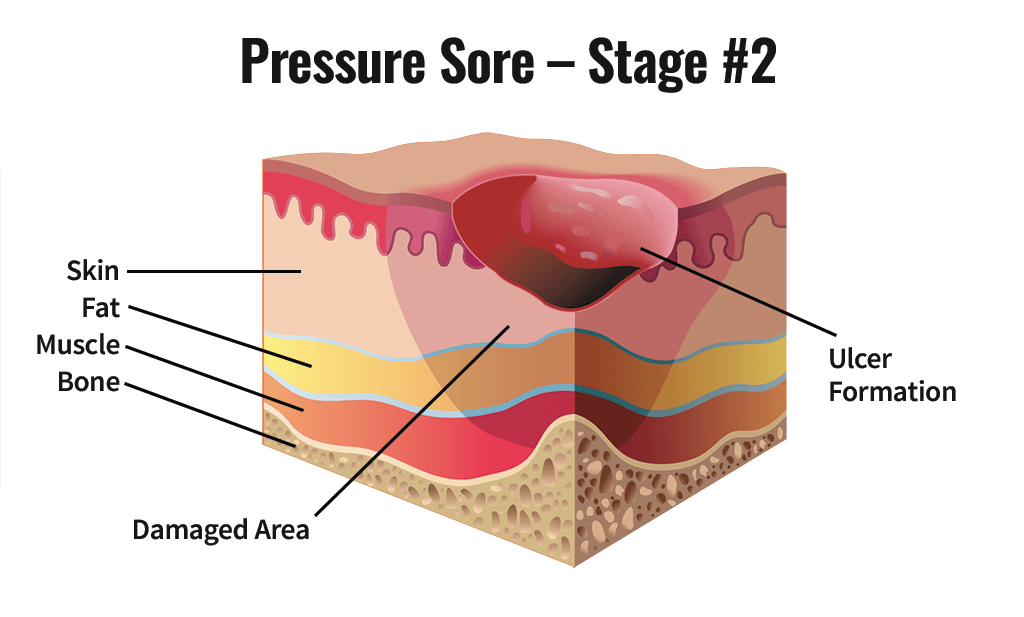
How to Recognize
The epidermis or topmost layer of the skin is broken, creating a shallow open sore. Drainage may or may not be present.
What to Do
Follow steps 1-4 under Stage One. Consult your health care provider for further treatment, which may include the following:
- Cleanse the wound with saline solution only and dry carefully. Apply either a transparent dressing (such as Op-Site or Tegaderm), a hydrocolloid dressing (such as DuoDERM), or saline dampened gauze. The first two types of dressing can be left on until they wrinkle or loosen (up to 5 days). If using gauze, it should be changed twice a day and should remain damp between dressing changes.
- Check for signs of wound healing with each dressing change.
- If there are signs of infection consult your health care provider for alternative wound care ideas and review of possible causes (see step 4 under Stage One).
Stage Three
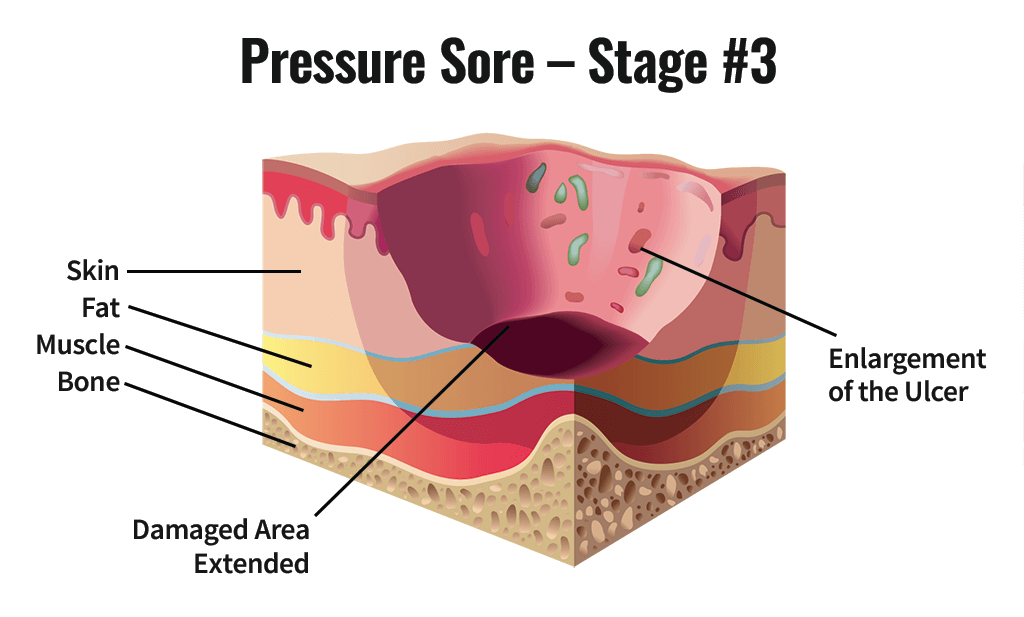
How to Recognize
The break in the skin extends through the dermis (second skin layer) into the subcutaneous and fat tissue. The wound is deeper than in Stage Two.
What to Do
Follow steps 1-4 under Stage One and the additional steps under Stage Two. Always consult your health care provider. Wounds in this stage frequently need additional wound care with special cleaning or debriding agents. Different packing agents, and occasionally, antibiotics (creams or oral pills) may be required. You may also qualify for a special bed or pressure-relieving mattress that can be ordered by your health care provider.
Stage Four

How to Recognize
The breakdown extends into the muscle and can extend as far down as the bone. Usually lots of dead tissue and drainage are present.
What to Do
Consult your health care provider right away. Surgery is frequently required for this type of wound.
How to Know if the Sore is Healing
- The sore will get smaller
- Pinkish tissue usually starts forming along the edges of the sore and moves toward the center; you may notice either smooth or bumpy surfaces of new tissue
- Some bleeding may be present. This shows that there is good blood circulation to the area, which helps healing.
Signs of Trouble
You need to seek help if any of the following occurs:
- An increase in the size or drainage of the sore
- Increased redness around the sore or black areas starting to form
- The sore starts smelling and/or the drainage becomes a greenish color
- You develop a fever
Complications Caused by Pressure Sores
- Can be life threatening
- Infection can spread to the blood, heart, bone
- Amputations
- Prolonged bed rest
- Autonomic dysreflexia
Reapplying Pressure
Only when a pressure sore is completely healed can pressure be reapplied over the area. Complete healing means that the outer layer of skin (the epidermis) is unbroken and normal coloring has returned to the area. Sometimes a scar may remain. A scar is healed tissue but will remain a somewhat different color from the surrounding skin. Scar tissue is never as tough as uninjured skin.
The first time pressure is applied to a newly healed area, it must be for a very short time (15 minutes at most). Then remove pressure from the area and inspect it for redness (erythema). If there is redness, observe it and time carefully how long it takes to fade to the color of the surrounding tissue (or the color it was before the pressure was applied in the case of a scar). If fading occurs in 15 minutes or less, no damage has occurred. Wait at least one hour and repeat pressure application.
After three successful 15-minute trials, increase to 30 minutes and repeat the above process using the guideline of a 15-minute or less fading time as a successful trial. After three successful 30-minute trials, you may increase the time by 30 minutes each day.
If at any point a trial is not successful, hold at that level until three successful trials are accomplished. In this way, you will rebuild your skin pressure tolerance.
Prevention
- Turning: Patients should be positioned properly in bed at all times. Patients should be turned frequently, every two hours at the beginning, and skin should be checked between turns. Turning time can be increased when hyperemia over bony prominences resolves within 30 minutes. All positions, including the prone position and side-lying, should be used. In time, patients will be independent or able to give instructions to a caregiver in bed positioning, turning, and skin checks.
- Sitting: Patients should sit no more than 30 to 60 minutes at the beginning. Their sitting time can be increased every few days, if hyperemia resolves within 30 minutes. The patients’ buttocks should be placed far back in the chair, and the footrests should be adjusted to permit the knees to be at or slightly below the level of the hips. Pressure reliefs should be performed frequently, every 15 to 30 minutes, for one minute. Recommended methods include leaning the patient forward, with chest toward the thighs, and tipping the wheelchair back 65 degree.
- Transfers: Transfers should be performed carefully to avoid shearing.
- Equipment:
- During the acute care phase, the patient is frequently in a supine position and the sacrum, occiput, and heels are at high risk for pressure sores. To prevent pressure sores, orthotic devices can be used to completely elevate the head off the bed and minimal air loss beds are beneficial. Donut-type devices should not be used. Thoracic and lumbar fractures are managed by immobilization in special beds that allow movement .
- Equipment used in the hospital should be as similar as possible to equipment that will be used after discharge in the home. Skin tolerance to standard mattresses and wheelchair cushions should be determined before discharge. Air-flotation and air-fluidized beds, for example, are suitable for hospital use in the beginning or to treat pressure ulcers, but they are not recommended for home use. An egg-crate foam mattress pad on top of a standard mattress is best suited to the home. Although wheelchair cushions reduce pressure over bony prominences, proper skin care and pressure reliefs are essential.
- Cushions: Cushions should be used in wheelchairs, for many bed positions, etc. Most cushions are made of foam or gel or filled with air or water.
- Foam cushions produce higher skin temperatures and less humidity. Custom contoured foam seat cushions are more effective than flat foam cushions.
- Gel cushions maintain skin temperatures (although they may require cooling after 3 hours to continue to be able to do this) and produce more humidity than foam; some gel-type cushions also improve posture.
- Air-filled cushions need to be checked daily for proper air pressure.
- Water-filled cushions decrease skin temperature; however, humidity increases more on water-filled cushions.
- Good Body Positions: Your position is important to relieving pressure on the sore and preventing new ones. You need to switch positions whether you are in a bed or a chair.
While In Bed
- Do not lie on the pressure sore. The use of pads or pillows to position the body will help relieve the pressure on specific areas.
- Change positions at lease every 2 hours
- Avoid lying directly on the hip bone. A 30-degree position is best
- When lying on your back, keep your lower legs up by placing a thin foam pad or pillow under the lower part of the legs (midcalf to ankle). Do not place the pad or pillow directly under the knee as this will reduce the flow of blood to the lower leg areas. Do not use donut shaped cushions as they will reduce the flow of blood.
- Use pillows or small pads to keep the knees and ankles from touching
- Raise the head of the bed as little as possible (30 degrees or less)
- Feed meals in an upright position to prevent choking
Pressure Relief
Pressure sores form when there is constant pressure on certain parts of the body. Long periods of unrelieved pressure cause or worsen pressure sores and slow healing once a sore has formed. Taking pressure off the sore is the first step toward healing.
Pressure sores usually form on parts of the body over bony prominences (such as hips and heels) that bear weight when you sit or lie down for a long time. You can relieve or reduce pressure by:
- Using special surfaces to support your body
- Putting your body in certain positions
- Changing positions often
Majority of content from: NW Regional Spinal Cord Injury System